
Accounts, plans, users and resellers
This page covers four admin screens that work together:
- Accounts: the customer hosting accounts on this server.
- Plans: the limits and catalogue details that accounts copy.
- Resellers: partners who own a pool of accounts and manage it from their own panel.
- Administrators: the operators who sign in to the admin area.
Accounts
Section titled “Accounts”Open Accounts in the admin sidebar. The page is titled Customer accounts and lists every account on this server, across all resellers.
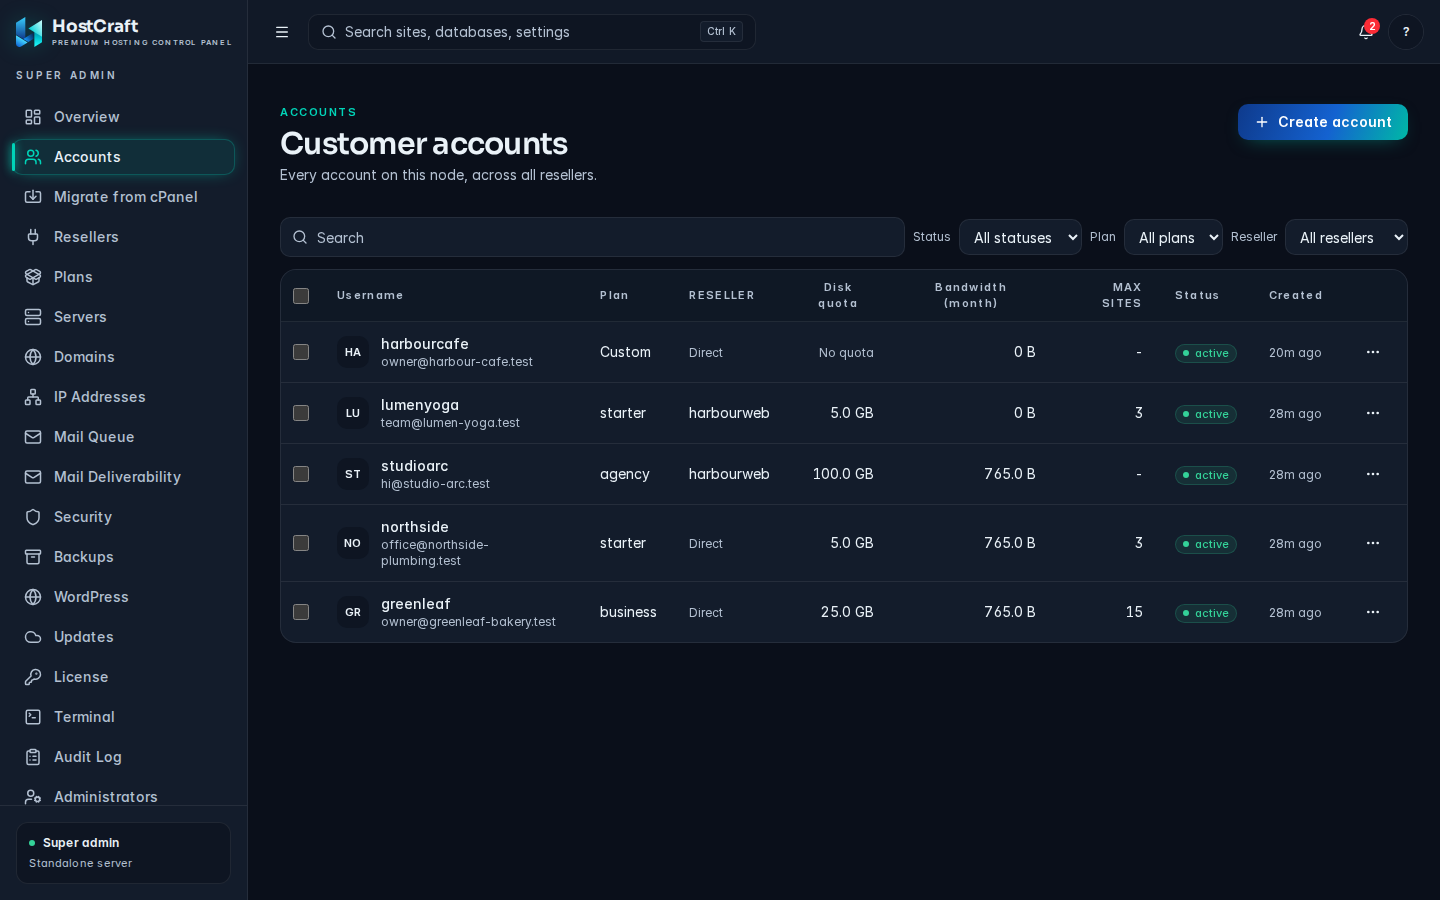
The accounts table
Section titled “The accounts table”| Column | Meaning |
|---|---|
| Username | The account's username and contact email. |
| Plan | The plan the account was created from. Custom means the account has no plan. |
| Reseller | The reseller pool that owns the account, or Direct when the server owns it. |
| Disk quota | The disk limit, or No quota. Live disk usage is not shown here. |
| Bandwidth (month) | Data served this month. When the account has a bandwidth limit, a bar shows how much of it is used (amber from 80 percent, red at 100 percent). |
| Max sites | The site limit, or - when unlimited. |
| Status | active, provisioning (still being created) or suspended. |
| Created | How long ago the account was created. |
Use the search box to find an account by username or email. Use the Status, Plan and Reseller filters to narrow the list. The Plan and Reseller filters only offer values that appear on at least one account.
Tip: on the Resellers page, View accounts in a reseller's row menu opens this table already filtered to that reseller.
Create an account
Section titled “Create an account”Who can do this: server admins and super admins. Resellers create accounts from their own panel (see the Reseller guide).
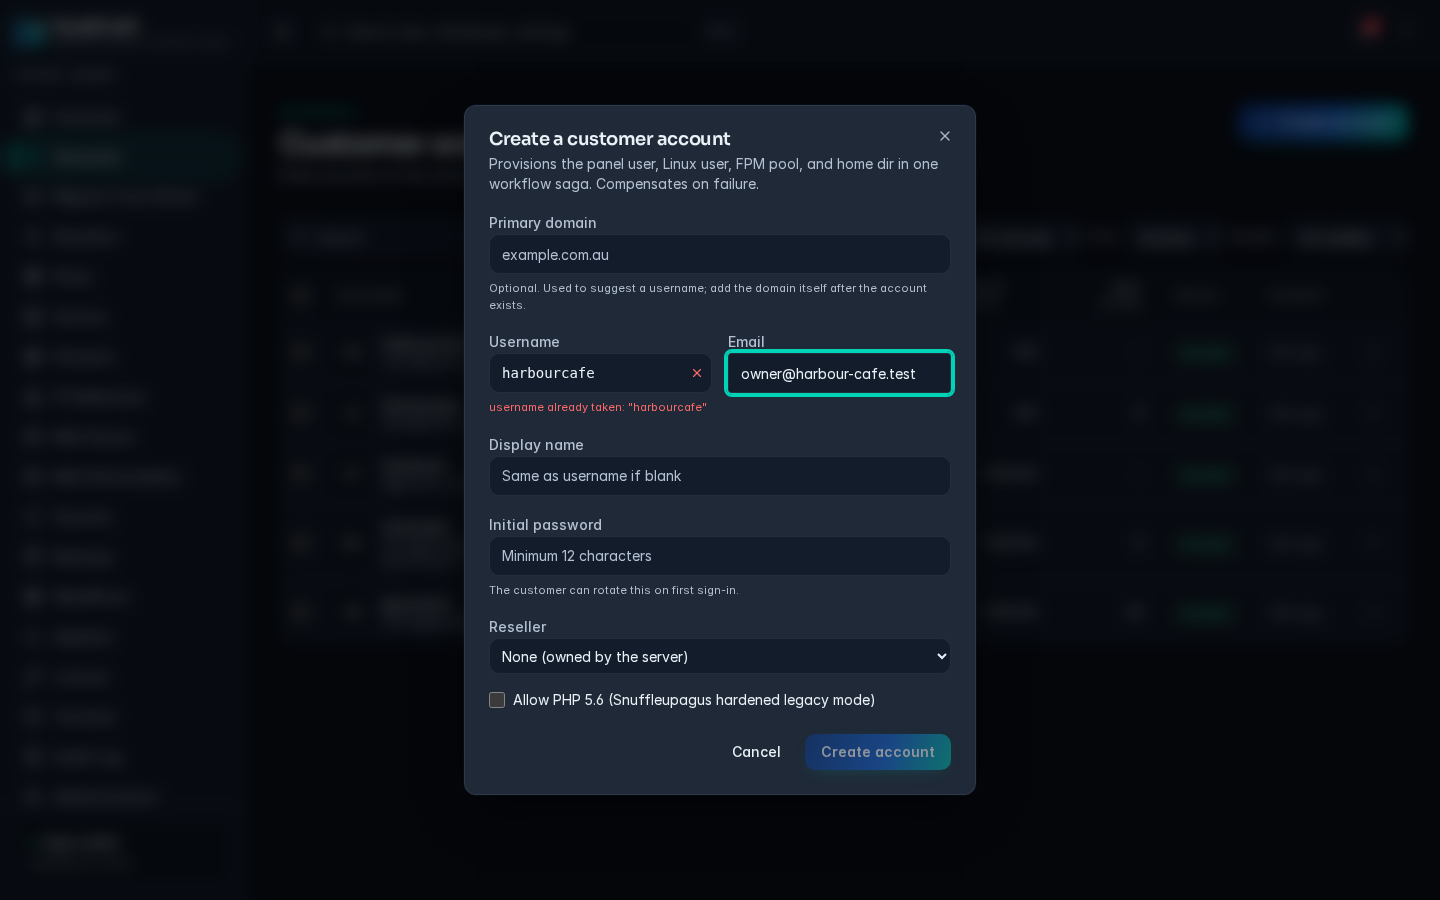
- Click Create account (top right). The Create a customer account dialog opens.
- Primary domain (optional): type the customer's main domain, for example
example.com.au. HostCraft uses it to suggest a username. It does not add the domain; add the domain after the account exists (see Domains and IP addresses). - Username: accept the suggestion or type your own. Rules:
- 1 to 16 characters, lowercase letters and digits only, starting with a letter (the same rule cPanel uses).
- It becomes the Linux user, the home directory
/home/<username>and the database prefix<username>_. - It cannot be changed later. A green tick means the name is free. A red cross shows the reason it is not available. If you typed your own name and want the suggestion back, click Use suggestion.
- Email: the customer's contact address. Required.
- Display name (optional): defaults to the username.
- Initial password: at least 12 characters. The customer can change it after signing in.
- Reseller: choose a reseller to place the account in that reseller's pool, or leave None (owned by the server). Suspended resellers are listed but cannot be chosen.
- Server: only shown on a cluster panel with more than one healthy node. Choose which node hosts the account's Linux user, sites, databases, mail and cron. Panel node (default) hosts it on the panel. You can move the account later from Servers.
- Allow PHP 5.6 (Snuffleupagus hardened legacy mode): tick only when the customer runs code that needs PHP 5.6.
- Click Create account.
The dialog switches to a progress view titled Provisioning account. HostCraft creates the panel login, the Linux user, the home directory, the disk quota, the resource limits and SFTP access in one workflow. If any step fails, the earlier steps are undone and nothing is left half created. The dialog closes itself a moment after success.
Suspend or unsuspend an account
Section titled “Suspend or unsuspend an account”Suspending stops the account's services on the server that hosts it until you unsuspend it. Files, databases and mail are kept. A suspended account cannot open an admin terminal session.
- Open the account's row menu.
- Click Suspend. The suspension reason is recorded as "admin action".
- To bring it back, open the row menu again and click Unsuspend.
To suspend several accounts at once, tick their checkboxes and choose Suspend selected from the bulk action bar.
Delete an account
Section titled “Delete an account”Deleting is permanent.
- Open the account's row menu and click Delete.
- Confirm the prompt "Delete account
<username>? This is permanent."
The delete workflow disables and signs out every login tied to the account (owner, sub-users and mailbox users), suspends the account, takes a final backup, removes its sites, PHP pools, Linux user, resource limits and home directory, and then deletes the logins with their sessions, API tokens and second factors.
To delete several accounts, tick them and choose Delete selected.
Common account errors
Section titled “Common account errors”| Message | Cause and fix |
|---|---|
| "Use 1 to 16 lowercase letters or digits, starting with a letter." | The username breaks the format rule. Remove capitals, dashes, dots or a leading digit. |
| A red cross with a reason under Username | The username is already taken, reserved, or clashes with an existing Linux user. Pick another. |
| "This server's HostCraft license blocked the request." | You have reached the account cap for your license tier, or the license is in the Restricted state. See Updates and license. |
| The workflow fails at a step | The step that failed is shown in the progress view. Everything done before it is rolled back. Look up the trace ID in the Audit Log for details. |
Open Plans. The page is titled Plan catalogue. A plan is a named set of limits plus catalogue details (price, billing period, features). New accounts copy a plan's limits when they are created. Editing a plan later does not change existing accounts until you apply the plan to them.
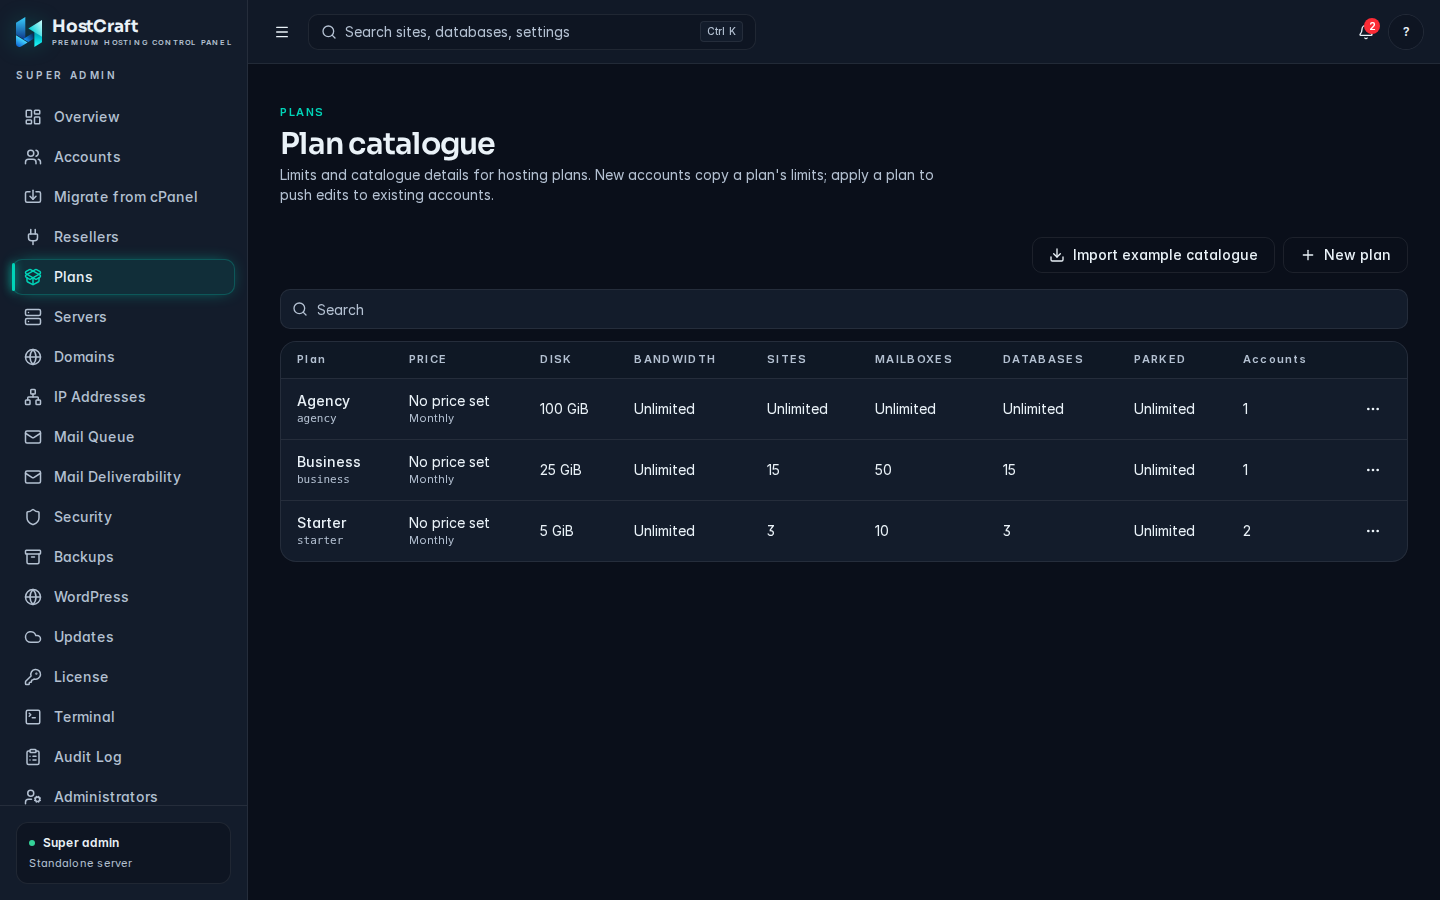
The plans table
Section titled “The plans table”Columns: Plan (name and ID, with an Inactive badge when the plan is not offered), Price (with billing period, or "No price set"), Disk, Bandwidth, Sites, Mailboxes, Databases, Parked and Accounts (how many accounts use the plan). Unlimited means no limit.
Start from the example catalogue
Section titled “Start from the example catalogue”If the catalogue is empty, click Import example catalogue. It adds a set of example plans you can edit. If the examples are already present, nothing is added and you see "Example plans already present".
Create a plan
Section titled “Create a plan”-
Click New plan.
-
ID: a short permanent identifier, 3 to 32 characters of lowercase letters, digits, dash or underscore. Leave it blank to build one from the name ("Business Pro" becomes
business-pro). The ID cannot be changed after the plan is created. -
Name: the name shown to admins and resellers.
-
Limits: for each limit, type a value or tick Unlimited.
0means none allowed.Field Unit Disk (GiB) Disk quota in GiB. Decimals are allowed. Bandwidth (GiB) Monthly data transfer in GiB. Memory (MiB) Memory cap for the account's processes. CPU quota (%) CPU share. 100 is one full core. Max processes Maximum running processes. Sites, Mailboxes, Databases, Subdomains, Addon domains, Parked domains, Sub users, Cron jobs, FTP users Counts. -
Catalogue:
- Price and Currency (a three letter code such as
AUD). Leave the price blank for "No price set". - Billing period: Monthly, Quarterly, Every 6 months, Annual, Every 2 years, 2 years upfront, Every 3 years or One time.
- Features (comma separated): free-form tags such as
ssl, dedicated_ip, support:priority. These are catalogue labels for your own use. - Display order: a whole number used to sort plans.
- Price excludes GST: ticked by default.
- Active (offered for new accounts): untick to retire a plan without deleting it.
- Allow legacy PHP versions (5.6, 7.x).
- Price and Currency (a three letter code such as
-
Click Create plan.
Edit a plan
Section titled “Edit a plan”Open the plan's row menu and click Edit. Change the fields and click Save plan. The ID is fixed. Existing accounts keep their old limits until you apply the plan.
Apply a plan to its accounts
Section titled “Apply a plan to its accounts”After you edit a plan's limits, push them to the accounts that use it:
- Open the plan's row menu and click Apply to accounts. (It is greyed out when no account uses the plan.)
- Read the dialog Apply
<plan>to its accounts and click Apply to accounts.
Each account is updated in its own workflow: the plan's limits are copied, and the disk quota and CPU, memory and process limits are reapplied. If one account fails, only that account rolls back. A message tells you how many accounts are being updated and how many could not be.
Delete a plan
Section titled “Delete a plan”Open the row menu and click Delete, then confirm. You can only delete a plan that no account uses. If accounts still use it, the menu item is greyed out with the hint "Reassign its accounts first".
Common plan errors
Section titled “Common plan errors”| Message | Fix |
|---|---|
| "ID must be 3 to 32 lowercase letters, digits, dash or underscore." | Shorten or clean up the ID, or leave it blank. |
| "Enter a plan name." | Fill in Name. |
"<field>: enter a value or tick Unlimited." |
A limit is blank. Type a number or tick Unlimited. |
"<field> must be 0 or more." |
Negative numbers are not allowed. |
| "Currency must be a three letter code." | Use a code like AUD or USD. |
| "Display order must be a whole number." | Remove decimals. |
Resellers
Section titled “Resellers”Open Resellers. A reseller owns a pool of hosting accounts and manages it from the reseller panel at /reseller. Resellers need a license that includes them; on the free tier the reseller cap applies.
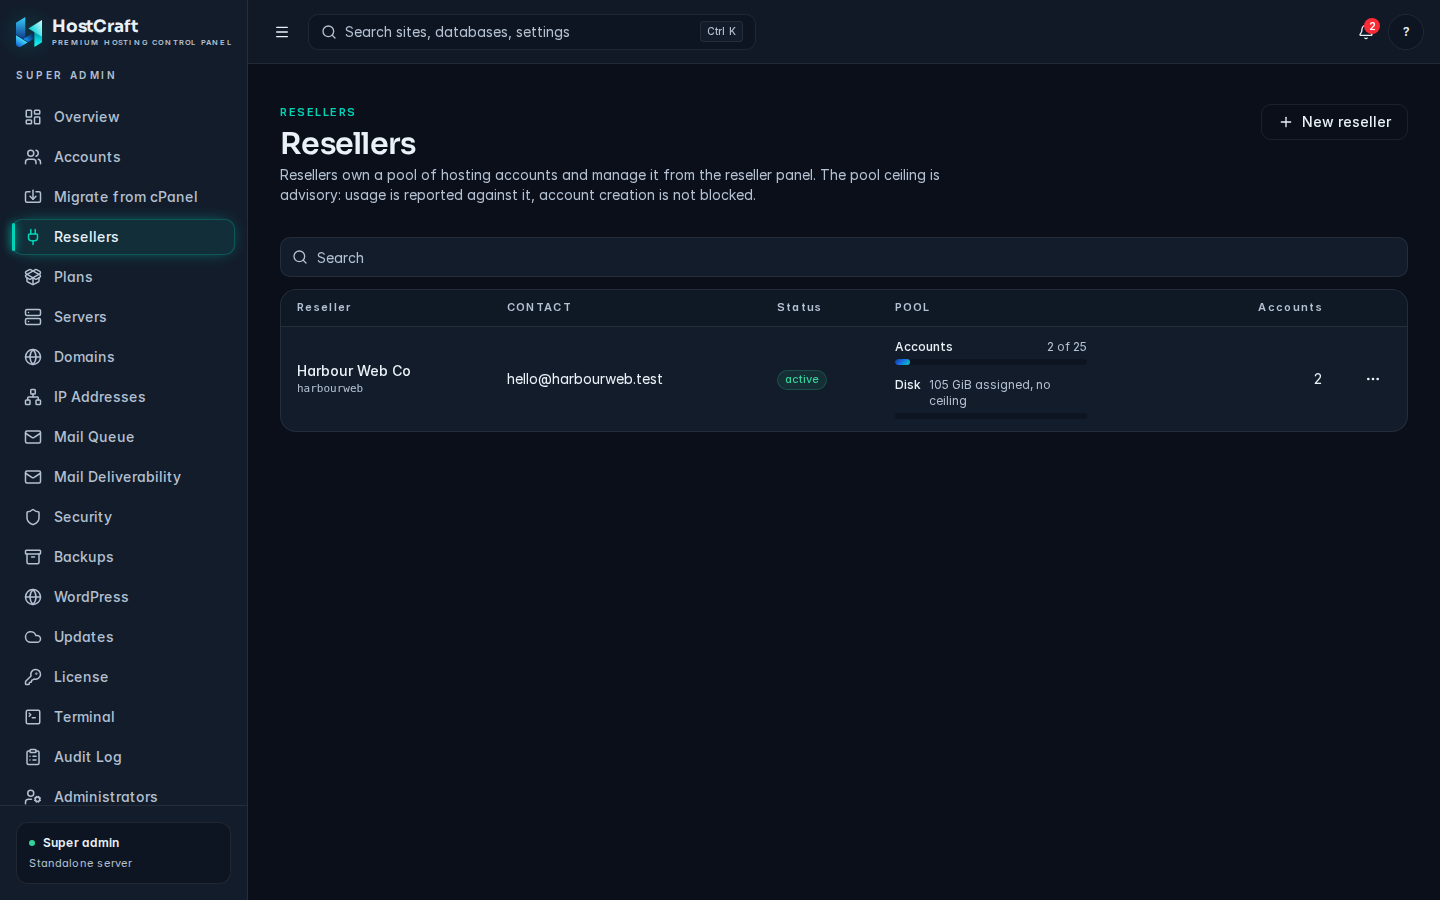
The resellers table
Section titled “The resellers table”| Column | Meaning |
|---|---|
| Reseller | Name and ID. |
| Contact | The reseller's contact email. |
| Status | active or suspended. |
| Pool | Usage of the pool against its ceiling. |
| Accounts | Accounts in the pool. |
What the pool ceiling does
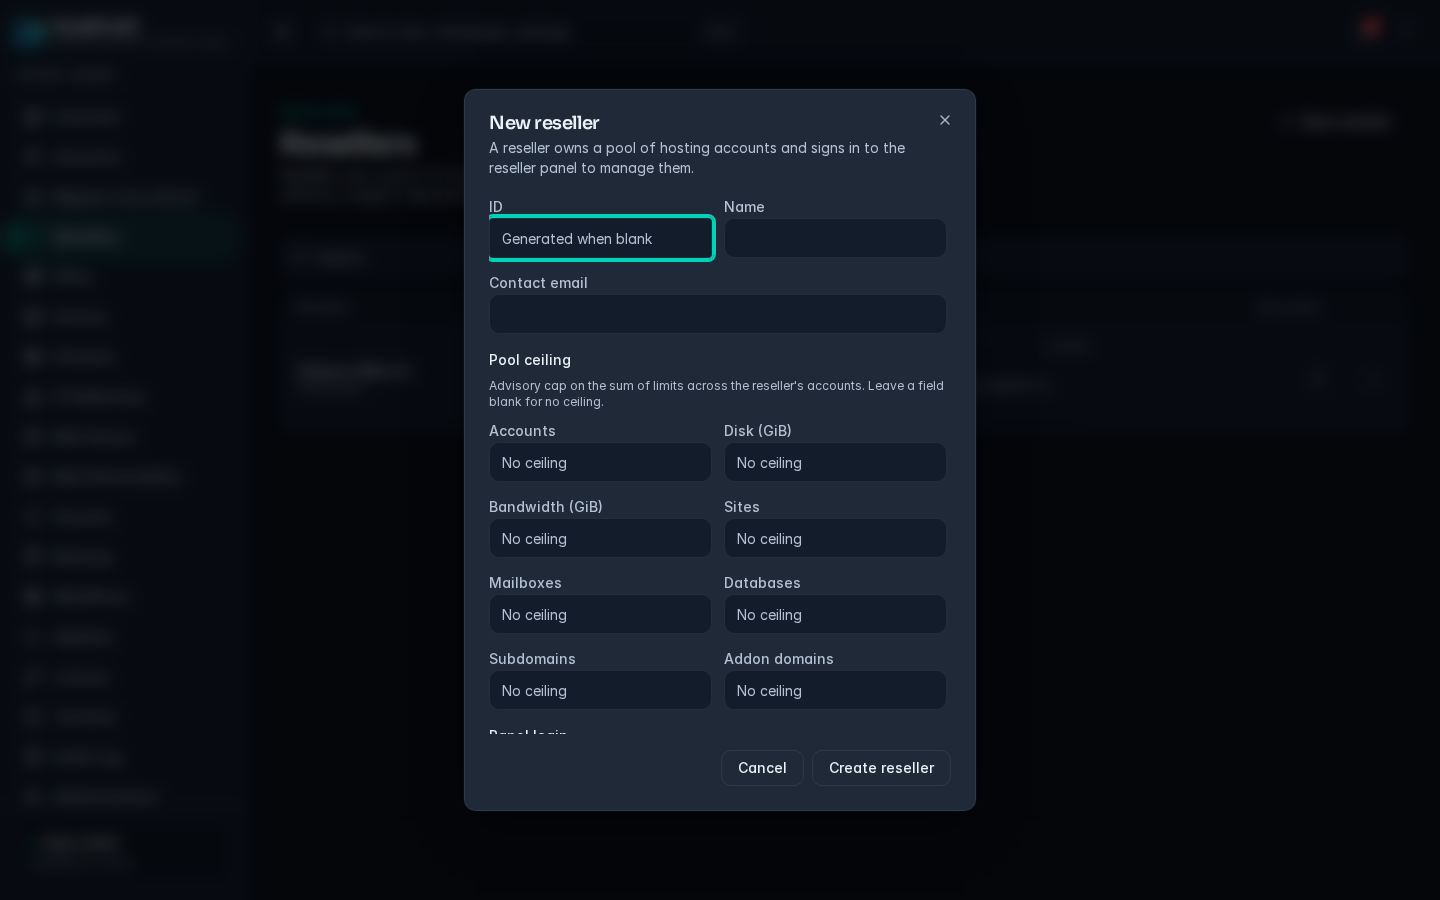
Section titled “What the pool ceiling does”The pool ceiling is an advisory cap on the total of the limits assigned to the reseller's accounts: Accounts, Disk (GiB), Bandwidth (GiB), Sites, Mailboxes, Databases, Subdomains and Addon domains. Usage is reported against the ceiling on your Resellers page and on the reseller's own overview. Account creation is not blocked when the ceiling is reached, so watch the Pool column.
Create a reseller
Section titled “Create a reseller”- Click New reseller.
- ID: 2 to 32 lowercase letters, digits or hyphens. Leave blank to generate one. If you are migrating from WHM, use the same ID as the WHM reseller username so migrated accounts land in the right pool automatically.
- Name and Contact email.
- Pool ceiling: fill in the caps you want. Leave a field blank for no ceiling.
- Panel login: Create a login for this reseller now is ticked by default.
- Login email: leave blank to use the contact email.
- Password (12 or more characters).
- Click Create reseller.
Give the reseller the login email and password over a separate channel. They sign in at the normal HostCraft login page and land in the reseller panel.
Edit a reseller
Section titled “Edit a reseller”Open the row menu and click Edit. You can change the name, contact email and pool ceiling, then click Save reseller. The ID cannot change.
Manage reseller logins
Section titled “Manage reseller logins”A reseller can have several logins (for example one per staff member). Each login acts on that reseller's pool only.
- Open the row menu and click Logins.
- The dialog lists each login with when it was last seen, and a Disabled badge if it is disabled.
- To add one, fill in Email, Display name and Password (12 or more characters) under Add a login, then click Create login.
- To remove one, click the bin icon next to it and confirm. Its sessions and API tokens are deleted.
Suspend or unsuspend a reseller
Section titled “Suspend or unsuspend a reseller”- Open the row menu and click Suspend.
- Enter a Reason.
- Leave Also suspend the
<n>account(s) in its pool ticked to suspend the pool's accounts too. Untick it to block only the reseller's logins. - Click Suspend reseller.
Every reseller login is signed out and blocked until you click Unsuspend in the row menu. Unsuspending restores exactly the accounts the reseller suspension suspended. Accounts that were suspended for other reasons stay suspended.
Delete a reseller
Section titled “Delete a reseller”Open the row menu and click Delete, then confirm. The reseller's logins are deleted too. You can only delete a reseller whose pool is empty; otherwise the item is greyed out with "Delete or move its accounts first".
Common reseller errors
Section titled “Common reseller errors”| Message | Fix |
|---|---|
| "ID must be 2 to 32 lowercase letters, digits or hyphens, or blank to generate one." | Correct the ID or clear it. |
| "Enter a valid contact email." / "Enter a valid login email." | Check the address. |
| "The login password must be at least 12 characters." | Use a longer password. |
| License error when creating | The reseller cap for your tier is reached, or your license does not include resellers. |
Administrators
Section titled “Administrators”Open Administrators (super admins only; server admins do not see this page). The page lists the operators who run the server. Changes on this page ask you to confirm your identity first.
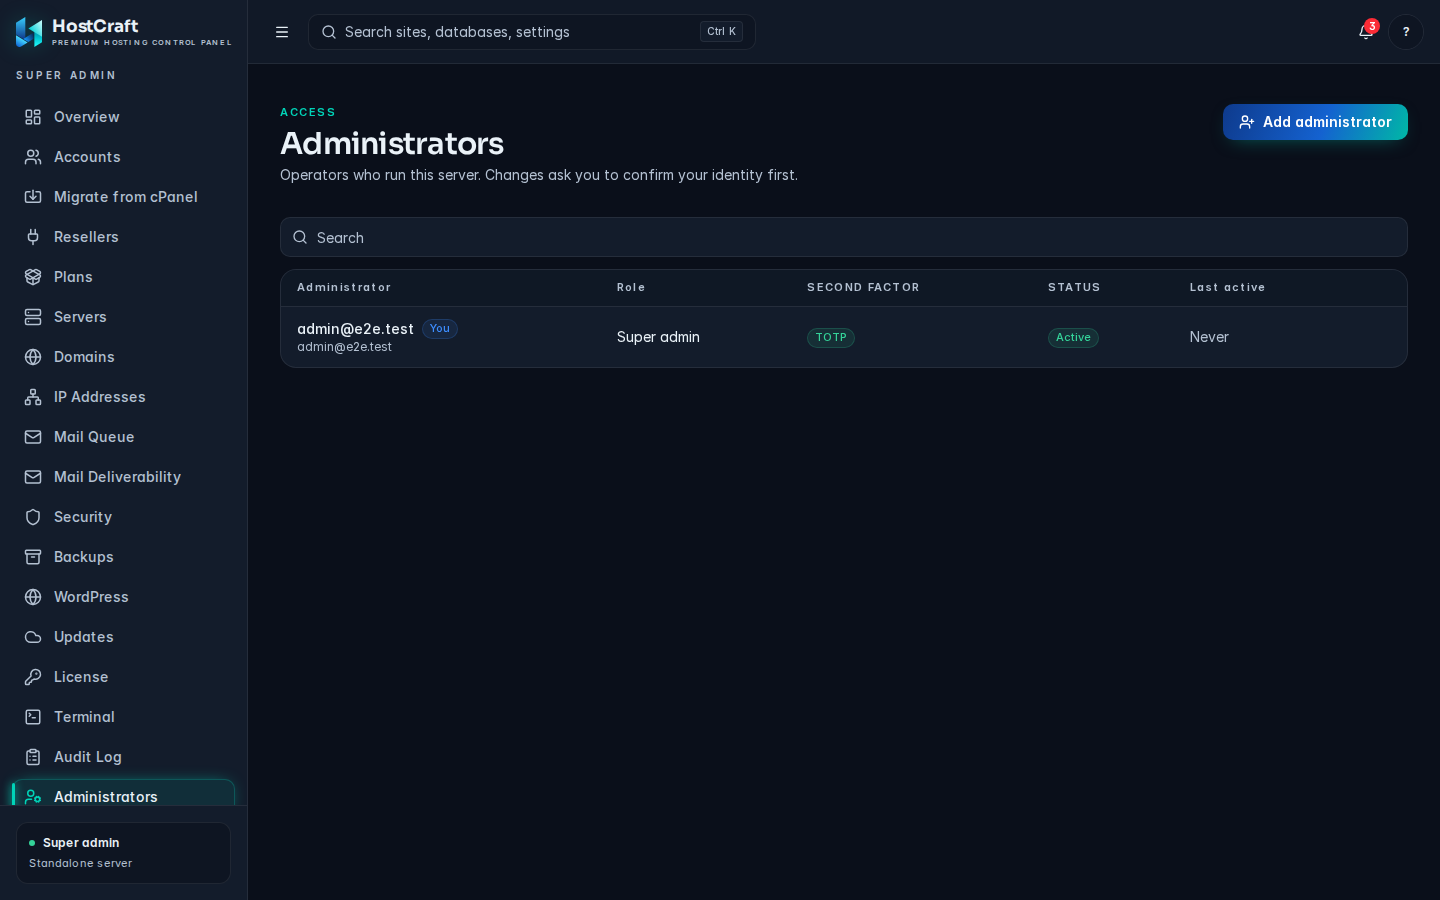
| Column | Meaning |
|---|---|
| Administrator | Display name and email. Your own row has a You badge. |
| Role | Super admin or Server admin. |
| Second factor | Passkeys and TOTP the administrator has enrolled, or Not set up. |
| Status | Active or Disabled. |
| Last active | When they last used the panel, or Never. |
Add an administrator
Section titled “Add an administrator”- Click Add administrator.
- Fill in Email, Name (optional), Initial password (at least 12 characters) and Role:
- Server admin runs the whole server.
- Super admin can also manage administrators and the license.
- Click Add administrator.
Share the password over a separate channel. The new administrator must set up a passkey or authenticator app the first time they sign in.
Change, disable, reset or delete an administrator
Section titled “Change, disable, reset or delete an administrator”Open the row menu on any row except your own:
- Make super admin / Make server admin: change the role.
- Reset second factors: removes every passkey, authenticator app and recovery code. Use this when an administrator has lost their device. They set up a new second factor at next sign-in, and their sessions are signed out.
- Disable: signs them out and blocks sign-in. Enable reverses it.
- Delete: removes the administrator permanently.
You cannot change or delete your own administrator record from this page. Ask another super admin.