
HostCraft runs a full mail stack for every account: Postfix delivers mail, Dovecot serves IMAP and POP3, Rspamd filters spam and SnappyMail provides webmail. You manage all of it from the Emails page.
Who can use this page
Section titled “Who can use this page”| Role | What they can do |
|---|---|
| Account owner | Everything on this page for the account's own domains. |
| Sub-user | Only what the account owner granted. Without mail permissions the Emails item does not appear in the sidebar. A read-only support login sees the page but every change button is hidden, and mailboxes only show a Details button. |
| Mailbox user | Does not see this page. Mailbox users get their own self service page; see My mailbox and webmail. |
| Admin and reseller | The Emails page is part of the customer panel, not the admin or reseller panel. Admins use Mail Queue and Mail Deliverability in the admin sidebar for server-wide mail. |
The Emails page
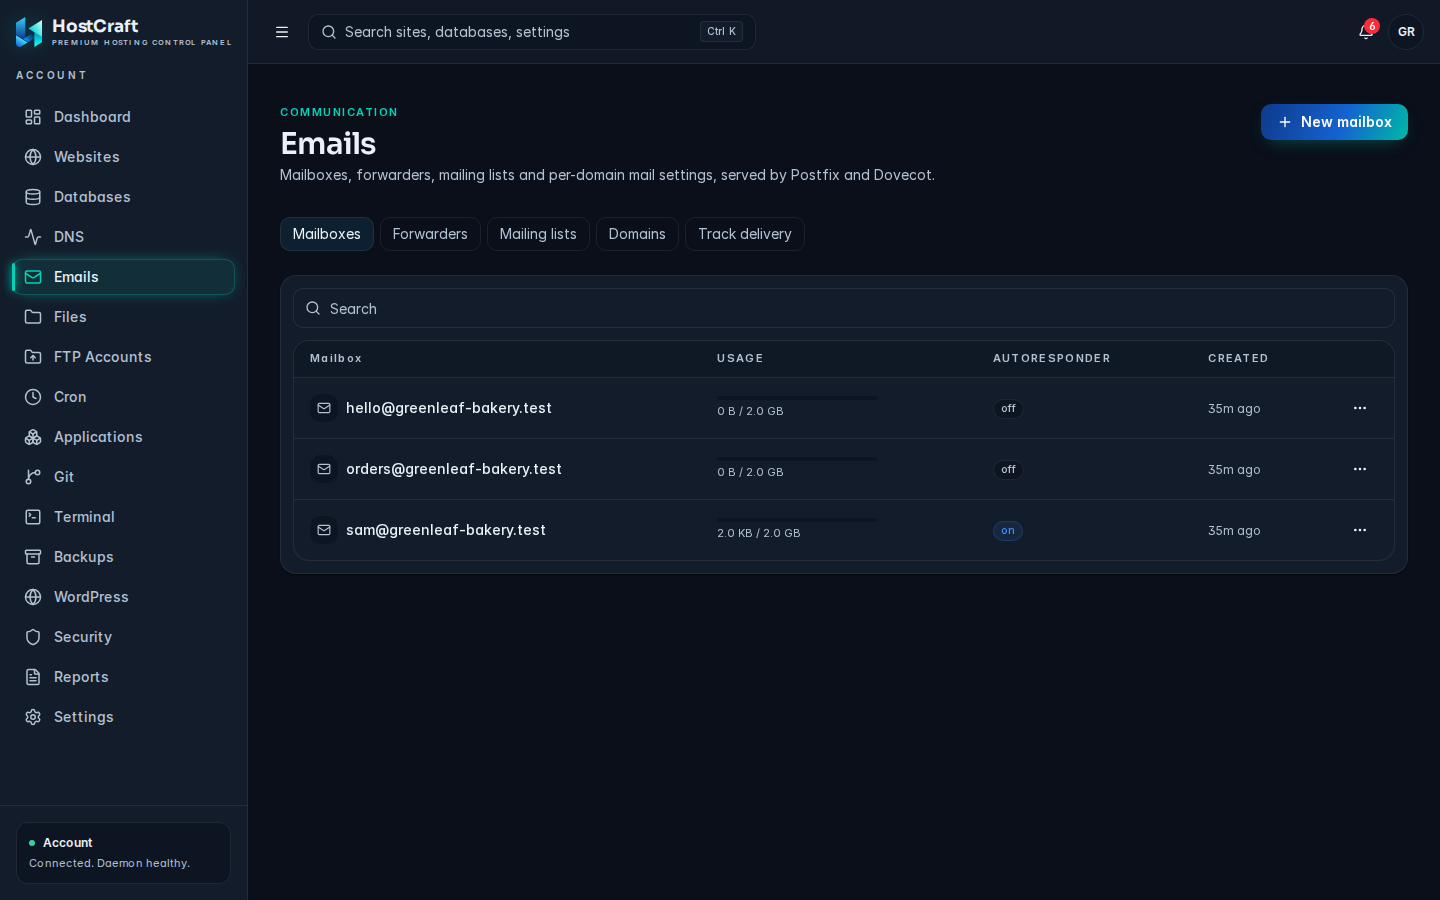
Section titled “The Emails page”Open Emails in the sidebar. The page has five tabs:
- Mailboxes: real mailboxes that store mail.
- Forwarders: addresses that relay mail to other addresses.
- Mailing lists: one address that delivers to many members.
- Domains: per-domain mail settings (enable mail, relay, MX, catch-all, DKIM, spam).
- Track delivery: search the delivery log.
The button in the top right changes with the tab: New mailbox on Mailboxes, New forwarder on Forwarders. If an action fails, the error appears in red under the tabs.
Before you can create mailboxes on a domain, mail must be enabled for it. See Enable mail for a domain.
Mailboxes
Section titled “Mailboxes”The Mailboxes tab lists every mailbox on the account with these columns:
- Mailbox: the full address.
- Usage: storage used against the quota. The bar turns to a warning colour above 85 percent. Mailboxes without a quota show
used / unlimited. - Autoresponder:
onoroff. - Created: how long ago the mailbox was created.
Use the search box to filter by address. The table shows 10 mailboxes per page.
Create a mailbox
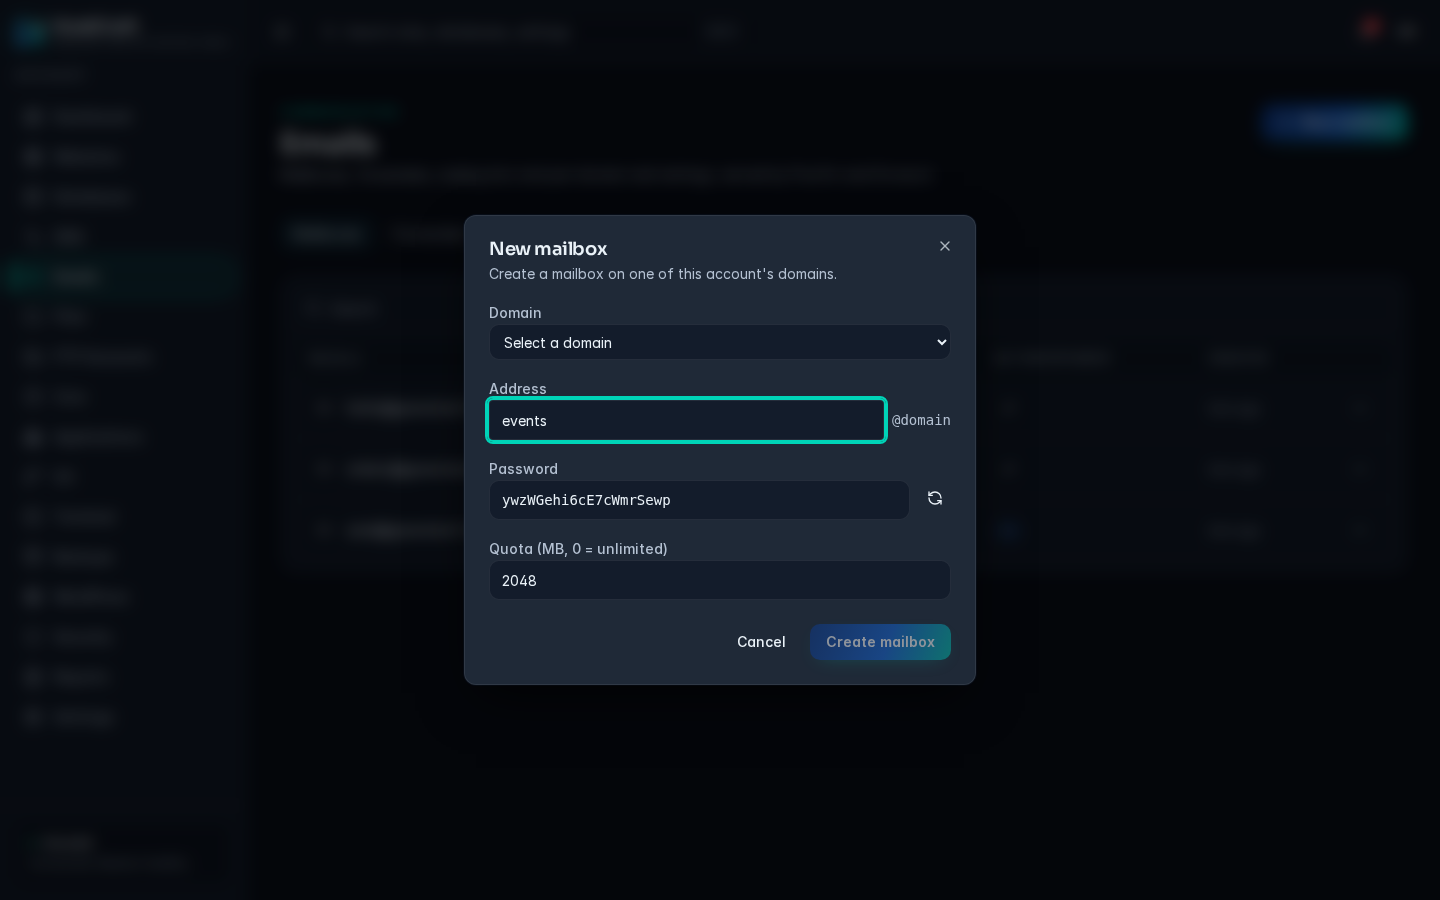
Section titled “Create a mailbox”- On the Mailboxes tab, click New mailbox.
- Domain: pick one of the account's domains.
- Address: type the part before the
@. For[email protected], typehello. The domain is shown next to the field. - Password: a random 20 character password is filled in for you. Click the refresh icon (Generate password) for a new one, or type your own. Copy it now; this is the password mail apps use.
- Quota (MB, 0 = unlimited): the storage limit in megabytes. The default is 2048 (2 GB). Enter 0 for no limit.
- Click Create mailbox.
The mailbox works straight away. The mailbox password is separate from your panel login.
Mailbox actions
Section titled “Mailbox actions”Click the ... button at the end of a mailbox row to open its menu:
| Action | What it does |
|---|---|
| Manage | Opens the mailbox dialog with usage, autoresponder, filters and spam training. |
| Open webmail | Asks for the mailbox password and opens SnappyMail in a new tab, already signed in. |
| Change password | Sets a new IMAP, POP3 and SMTP password. Enter it twice. |
| Set quota | Changes the storage limit in MB. 0 means unlimited. |
| Create webmail login | Creates a panel login for the person who uses this mailbox. |
| Delete mailbox | Deletes the mailbox after a confirmation. |
Change a mailbox password
Section titled “Change a mailbox password”- Open the mailbox menu and choose Change password.
- Enter the new password in Password and again in Confirm password.
- Click Change password.
Mail apps that use the old password stop working until they are updated.
Change a quota
Section titled “Change a quota”- Open the mailbox menu and choose Set quota.
- Enter the limit in Quota (MB). Use 0 for unlimited.
- Click Save quota.
Open webmail as the account owner
Section titled “Open webmail as the account owner”- Open the mailbox menu and choose Open webmail.
- Enter the mailbox password and click Open webmail.
SnappyMail opens in a new browser tab, signed in to that mailbox. The panel checks the password before it opens the session. If your browser blocks pop-ups, the panel opens webmail in the current tab instead.
Give a mailbox user their own login
Section titled “Give a mailbox user their own login”A webmail login lets the person who uses a mailbox sign in to the panel with their email address. They only see their own mailbox: a self service page plus webmail. They cannot see other mailboxes or anything else on the account.
- Open the mailbox menu and choose Create webmail login.
- The dialog tells you whether a login already exists for this mailbox. Each mailbox can have only one, so Create login is disabled if one exists.
- Enter a password of at least 12 characters in Password and Confirm password.
- Click Create login.
Give the user their email address and this password. They sign in on the normal panel login page. What they see there is described in My mailbox and webmail.
The login password and the mailbox password are separate. The user needs the mailbox password to open webmail and to set up mail apps.
Delete a mailbox
Section titled “Delete a mailbox”- Open the mailbox menu and choose Delete mailbox.
- Confirm the prompt.
Deleting a mailbox removes its stored mail and any webmail login linked to it. This cannot be undone, so take a backup first if you might need the mail.
Manage a mailbox
Section titled “Manage a mailbox”Choose Manage in the mailbox menu to open a dialog with four sections: usage, autoresponder, filters and training.
Shows storage used against the quota. Click Refresh to read the current figure from the mail server.
Set up an autoresponder
Section titled “Set up an autoresponder”An autoresponder sends an automatic reply to incoming mail, for example an out of office notice.
- Open Manage and choose autoresponder.
- Fill in Subject and Message. Both are required.
- Optionally set Starts (optional) and Ends (optional) to a date and time. Outside that window no replies are sent.
- Tick Enabled to turn replies on.
- Click Save. You see "Autoresponder saved."
To delete the autoresponder, click Remove and confirm. The Autoresponder column on the Mailboxes tab shows on while it is active.
Mail filters
Section titled “Mail filters”Filters act on incoming mail before it reaches the inbox. They are stored as Sieve scripts on the mail server, but you build them from menus.
To add a filter:
-
Open Manage and choose filters.
-
Under New filter, enter a Name.
-
Choose a field: From, To, Cc, Subject, Body or Size (bytes).
-
Choose an operator. For text fields: contains, is, matches (wildcard) or regex. For size: greater than or less than.
-
Enter the Value to match.
-
Choose an action:
Action Extra field Result Move to folder Folder Files the message into that folder. Redirect Redirect to Sends the message to another address. Add flag Flag Adds an IMAP flag. Discard none Deletes the message silently. Reject Reason (optional) Refuses the message with a reason. Keep none Delivers to the inbox as normal. Stop processing none Stops later filters from running. -
Click Add filter.
Filters run from top to bottom. Use the up and down arrows (Move up, Move down) to change the order. Disable pauses a filter without deleting it and Enable turns it back on. The bin icon deletes it after a confirmation.
Spam training
Section titled “Spam training”Teach the spam filter about a message that was sorted wrongly.
- Find the message in your mail app and copy its
Message-IDheader (it looks like<[email protected]>). - Open Manage, choose training and paste the Message-ID.
- Click Report as spam or Report as not spam.
The message must still be stored in this mailbox.
Forwarders
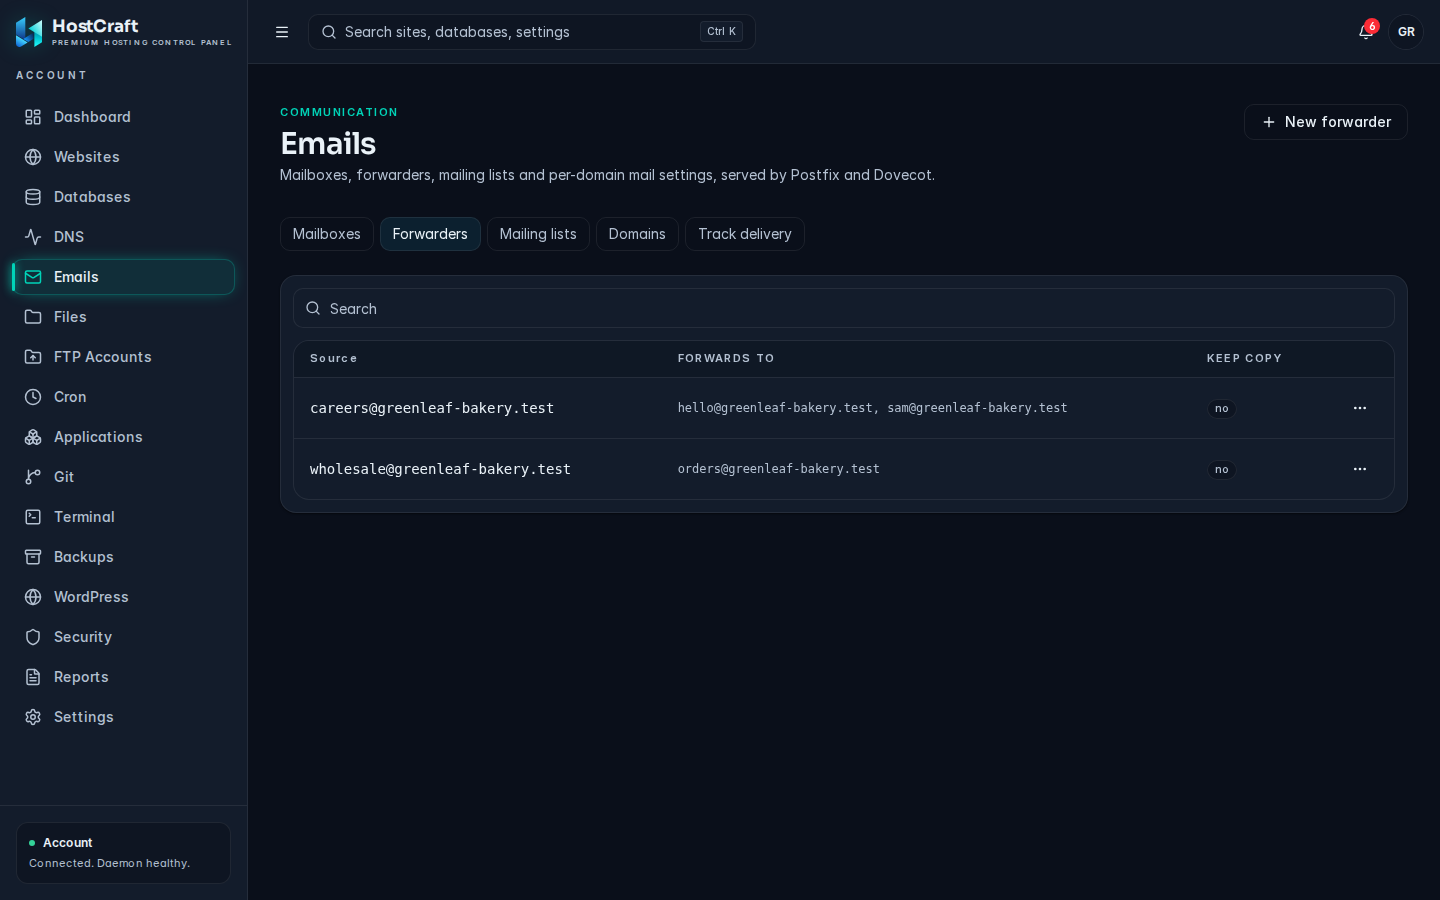
Section titled “Forwarders”A forwarder relays mail for an address to one or more other addresses. The address does not need a mailbox.
The Forwarders tab shows Source, Forwards to and Keep copy (whether a copy also stays in a local mailbox).
Create a forwarder
Section titled “Create a forwarder”- On the Forwarders tab, click New forwarder.
- Domain: pick the domain.
- Source address: the part before the
@, for examplesales. - Forward to: one or more destination addresses, separated by commas or new lines. Destinations can be on any domain.
- Tick Also keep a copy in the local mailbox if a mailbox with the same address should also keep the mail.
- Click Create forwarder.
Edit, keep a copy, or delete
Section titled “Edit, keep a copy, or delete”Open the ... menu on a forwarder row:
- Edit destinations: change the list of addresses, one per line or comma separated, then click Save destinations.
- Keep a local copy or Stop keeping a local copy: switches the copy setting immediately.
- Delete forwarder: removes it after a confirmation.
When you edit destinations the panel checks them first:
| Message | Fix |
|---|---|
| Enter at least one destination address. | Add an address, or delete the forwarder instead. |
| Not a valid email address: ... | Correct the listed addresses. |
| A forwarder cannot deliver to its own source address. | Remove the source address from the list. |
Duplicate addresses are removed automatically.
Mailing lists
Section titled “Mailing lists”A mailing list is one address that delivers each message to every member. Lists imported from cPanel Mailman appear here with their owners and members.
The Mailing lists tab shows List address, Members, Owners and Moderation.
Create a list
Section titled “Create a list”- Open the Mailing lists tab and click New list.
- Domain: pick the domain.
- List address: the part before the
@, for examplenews. - Description: optional, for example "Monthly customer newsletter".
- Owners: at least one owner address.
- Members: one address per line. The label shows how many members you have entered.
- Click Create list.
Edit, moderate or delete a list
Section titled “Edit, moderate or delete a list”Open the ... menu on a list row:
- Edit list: change the description, owners and members, then click Save changes. Requests to join or leave go to the list's
-requestaddress, shown at the top of the dialog. - Turn moderation on or Turn moderation off: when moderation is on, mail sent to the list reaches the owners only. An owner approves a post by resending it to the list's private post address, shown in the edit dialog. Keep that address private: anything sent to it reaches every member.
- Delete: removes the list after a confirmation. Members are not notified.
Lists are delivered by Postfix alias expansion. HostCraft does not add list headers (Reply-To, List-Unsubscribe), keep archives or handle self-service subscriptions. Use a dedicated list service when you need those.
Domain mail settings
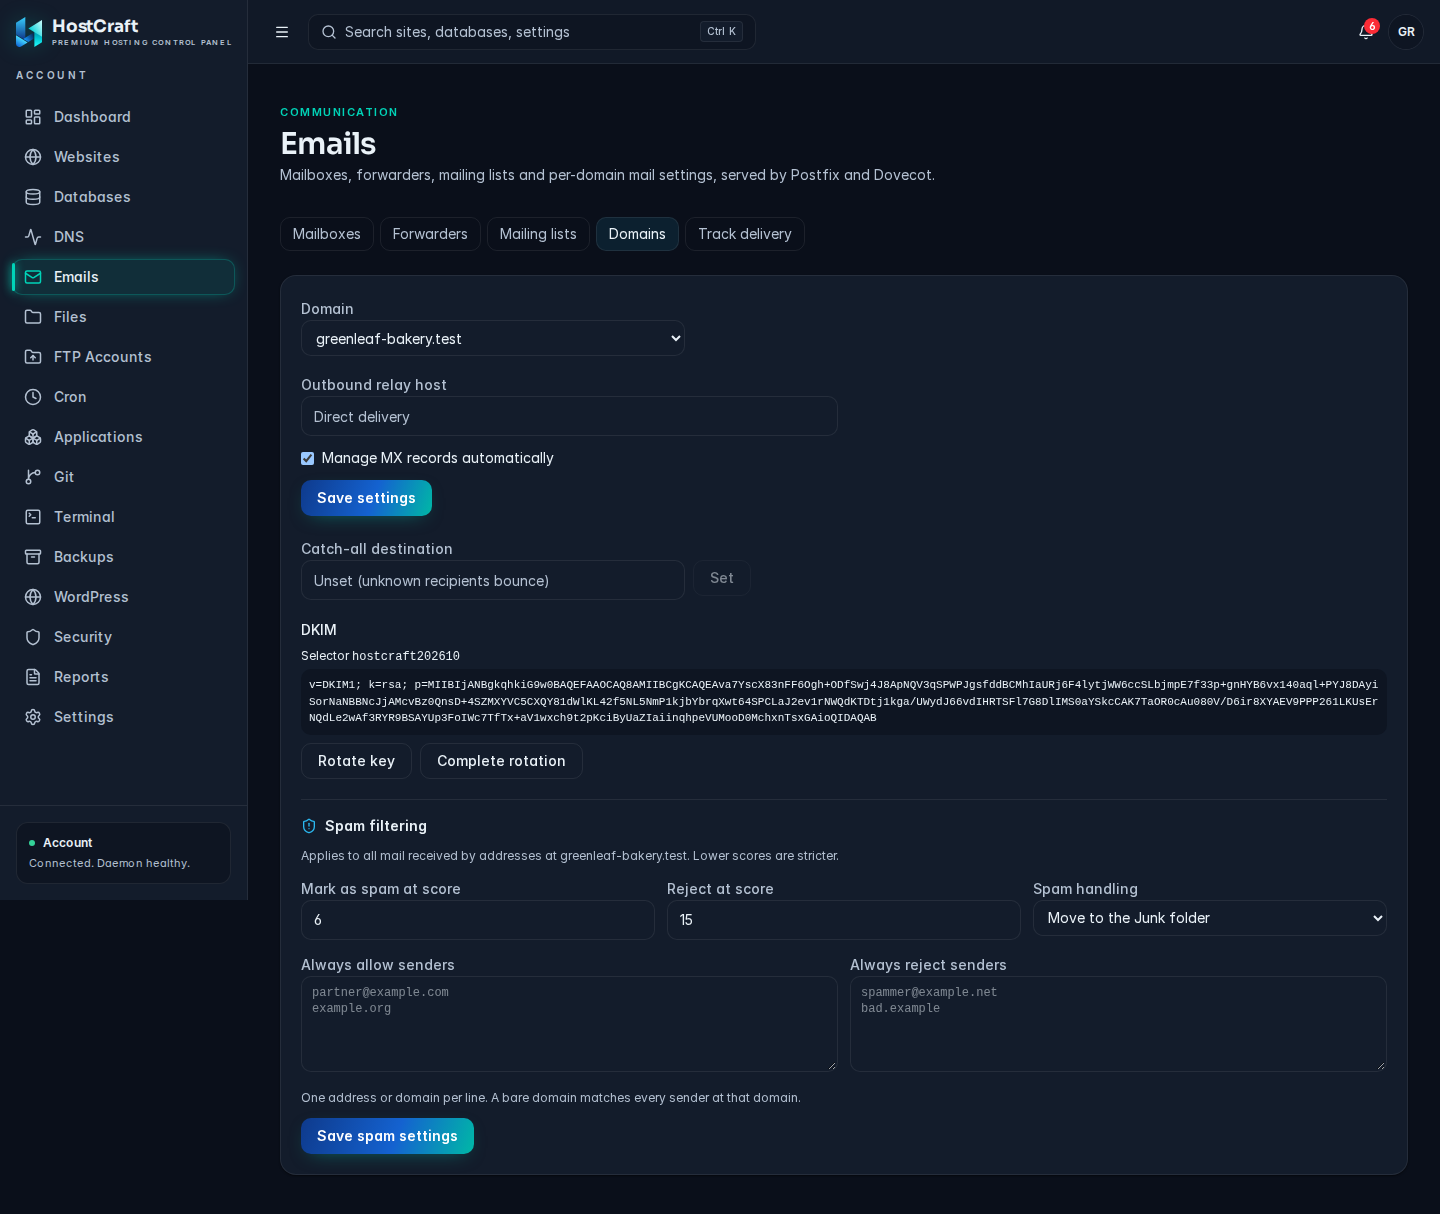
Section titled “Domain mail settings”The Domains tab holds the mail settings for one domain at a time. Pick the domain from the Domain list at the top.
Enable mail for a domain
Section titled “Enable mail for a domain”If mail is off for the domain you see "Mail is not enabled for example.com."
- Click Enable mail.
- Wait for the Enabling mail progress bar to finish. The settings appear when it is done.
You need mail enabled before you can create mailboxes, forwarders or lists on the domain.
Outbound relay and MX
Section titled “Outbound relay and MX”These settings control how mail leaves and arrives.
-
Outbound relay host: leave empty for direct delivery (the server sends mail itself). Enter a smart host, such as your provider's SMTP relay, to send through it.
-
Relay username and Relay password: appear once a relay host is filled in. A stored password shows "Stored (leave blank to keep)". Click Clear stored password to remove both the stored username and password; the relay host is kept.
-
Manage MX records automatically: when ticked, HostCraft keeps the domain's MX records pointing at this server. Untick it to enter your own.
-
Custom MX (one per line: priority host): shown when automatic MX is off. Example:
10 mx1.example-provider.com20 mx2.example-provider.com
Click Save settings. You see "Saved." when it worked. Lines without a number and a host are not accepted, so the form does not save until they are fixed.
Using an external mail service (such as Microsoft 365 or Google Workspace): untick Manage MX records automatically, enter the provider's MX hosts in Custom MX, and save. Then update the SPF TXT record on the DNS page to include the provider, following the provider's instructions.
Catch-all address
Section titled “Catch-all address”A catch-all receives mail sent to any address on the domain that does not exist. Without one, mail to unknown addresses bounces, as the empty field says: "Unset (unknown recipients bounce)".
- Enter the destination address in Catch-all destination.
- Click Set.
To turn it off, click Remove. A catch-all attracts a lot of spam, so use it only when you need it.
DKIM signs outgoing mail so receivers can check it really came from your domain. The DKIM section shows the active Selector and the DNS record that publishes the public key. "No active DKIM key." means the domain has no key yet.
When the domain's DNS is hosted on HostCraft, check the record is present on the DNS page. If your DNS is hosted elsewhere, copy the record shown here into your DNS provider.
Rotate the DKIM key:
- Click Rotate key and confirm.
- The panel shows a new selector and a new DNS record. Publish that record in DNS.
- Wait for DNS to propagate (allow at least the record's TTL).
- Click Complete rotation. The panel shows "Active selector is now ...".
Do not complete the rotation before the new record resolves, or receivers will fail DKIM checks on your mail.
Spam filtering
Section titled “Spam filtering”Spam settings apply to all mail received by addresses on the domain. Lower scores are stricter.
- Mark as spam at score: messages at or above this score are treated as spam. Minimum 1, in steps of 0.5.
- Reject at score: messages at or above this score are refused outright. It must be higher than the mark score, otherwise you see "The reject score must be higher than the spam score."
- Spam handling: what happens to marked messages: Move to the Junk folder, Deliver to the inbox (marked as spam) or Delete on arrival.
- Always allow senders and Always reject senders: one address or domain per line. A bare domain matches every sender at that domain.
Click Save spam settings. You see "Spam settings saved."
Track delivery
Section titled “Track delivery”The Track delivery tab searches the mail log for your domains.
- Enter an Address, queue ID or Message-ID.
- Pick a Result: Any, Delivered, Deferred, Bounced, Rejected or Expired.
- Pick a Period: Last hour, Last 24 hours, Last 7 days or Last 30 days.
Results show When, From, To, Result and Detail. The detail column holds the receiving server's response, which usually explains a bounce or deferral. "No deliveries found" means nothing matched in that period.
Connecting mail apps
Section titled “Connecting mail apps”Use the full email address as the username and the mailbox password. Your hosting provider gives you the server hostname for IMAP, POP3 and SMTP.
Common problems
Section titled “Common problems”| Problem | Cause and fix |
|---|---|
| No domains in the Domain list | The account has no domains yet. Add one on the Websites or Domains page first. |
| Creating a mailbox fails on a new domain | Mail is not enabled for the domain. Go to Domains and click Enable mail. |
| New mailbox button missing | You are on a read-only login or lack mail permissions. Ask the account owner. |
| Mail app rejects the password | Use the mailbox password, not the panel password. Reset it with Change password. |
| Create login greyed out | That mailbox already has a webmail login. Only one is allowed per mailbox. |
| "Password must be at least 12 characters." | Webmail logins need 12 or more characters. |
| "Passwords do not match." | Retype the confirmation. |
| Mail to an unknown address bounces | Expected without a catch-all. Create a forwarder or set a catch-all. |
| Mail lands in spam at Gmail or Outlook | Check the DKIM record is published, and that SPF includes any relay you use. Look up the message under Track delivery. |